
Knowing how to assemble a reclining sofa can save you time, stress, and the awkward feeling of staring at a few large sofa sections with no idea where to start. This guide breaks the job into a clear order: prep the room, identify the parts, connect the sections, test the recline, and handle small problems before they become bigger ones. Whether your sofa is manual or power, the goal is simple. You want a setup process that feels calm, safe, and easy to follow from the first box to the first sit.
Table of Contents
What Do You Need Before You Assemble a Reclining Sofa?
Before you touch a bracket or power cable, a few basic checks make the job much smoother. This part covers the space, parts, tools, and time you should prepare first, so the actual assembly feels organized instead of rushed or messy.
What parts and tools should you prepare?
Most reclining sofas arrive in large, prebuilt pieces rather than dozens of loose panels. That means your checklist is usually short and practical: sofa sections, back or arm pieces, legs, and, for power models, the adapter and cables. The Povison manual for its power reclining sofa also shows a simple component list with sofa legs, a power adapter, Y-splitter cables, and a power cord.
Keep these nearby before you start:
- the instruction manual
- scissors or a box cutter
- gloves for grip
- a soft blanket or cardboard to protect the floor
- a phone for taking quick reference photos
- a second person for heavier sections
Before delivery day, it also helps to know how to measure your space for a new sofa, because doorway clearance and wall clearance can matter more than the sofa’s listed width.
The setup experience can vary a lot, so a quick comparison helps:
| Setup type | What arrives | Tools | Typical setup time | Best for |
| Fully assembled recliner | Main piece already built | None | Minutes | Fast, low-stress setup |
| Light-assembly reclining sofa | Prebuilt sections, legs, power parts | None or very basic tools | About 5–15 minutes on some modern models | Most online sofa buyers |
| Flat-pack or ready-to-assemble sofa | Many loose parts and hardware | Hand tools required | Often 2–6 hours | Budget-first DIY shoppers |
That middle row is where most readers searching this topic actually land: not a full build, just a short connection job.
How much time and effort should you expect?
Most reclining sofas with light assembly can be set up in about 10 to 20 minutes, depending on the size and whether the model includes power functions. Some modern designs are even faster. For example, the Povison product page lists an estimated setup time of 5–15 minutes with no tools required. Compared with flat-pack furniture, a fully assembled or light-assembly recliner is much more convenient because most of the structure is already built before it arrives.
How to Assemble a Reclining Sofa Step by Step
Putting a reclining sofa together is usually easier than people expect. In most cases, you are not building the sofa from scratch. You are simply connecting a few large pieces in the right order, then checking that the reclining function works smoothly and safely.
Step 1. Put the Base in the Right Spot
Start by placing the main seat section close to its final position. Leave enough space behind and in front of the sofa so the footrest and back can move freely. Put cardboard or a soft blanket under the frame if you need to slide it across the floor.
Step 2. Unpack and Match All Left/Right Parts
Open all boxes and group the parts before assembly. Check which pieces belong on the left, right, or center. This small step saves time later and helps you avoid forcing the wrong parts together.
Key things to check:
- seat sections
- backrests
- armrests or side panels
- legs
- power adapter and cables for power models
Step 3. Slide the Backrests into the Metal Brackets
Lift each backrest and line it up with the metal guides on the base. Then slide it down slowly until it feels secure. Do not force it. If it does not fit easily, stop and check the alignment again.
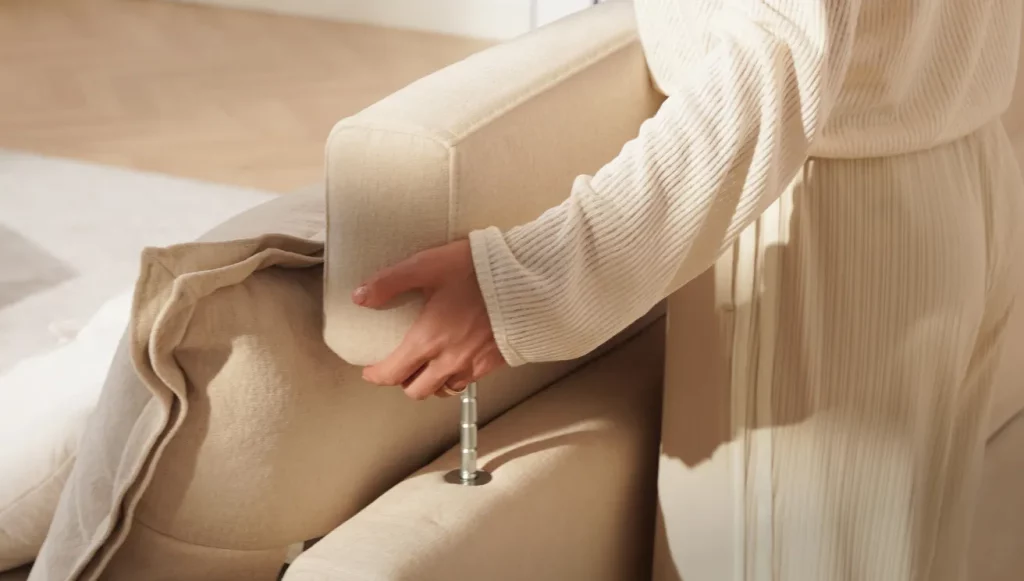
Step 4. Attach the Armrests or Side Panels
Once the backrests are in place, attach the armrests or side panels. Some models slide into metal tracks, while others use a simple locking connection. Make sure both sides sit evenly and do not wobble.
Step 5. Connect the Power Cables if It Is a Power Recliner
If your sofa has power reclining features, connect the adapter and cables exactly as shown in the manual. Push each plug in fully and keep the wires clear of the frame, legs, and moving parts. A loose or pinched cable can stop the recliner from working.
Step 6. Test Every Seat Before Full Use
Before you finish, test each seat one by one. Recline it fully, return it upright, and check that everything moves smoothly. The sofa should feel level, quiet, and stable in normal use.
Use this quick final check:
- every section is fully connected
- backrests feel locked in place
- arms and sides sit evenly
- power functions respond correctly
- no cable is trapped under the frame
What Is a Fully Assembled Recliner and Is It Easier to Set Up?
A fully assembled recliner usually arrives with the main structure already built, so you are not dealing with loose boards or a long hardware list. In most cases, the only work left at home is light setup. A good example is the Modern Dual Power Reclining Sofa, which offers independent headrest and footrest adjustment while keeping setup simple. The product page lists no tools required, 1–2 installers, and 5–15 minutes, while the dual power reclining sofa installation manual shows a short six-step process for attaching legs, joining sections, connecting power, testing functions, and placing the pillows.

How Do You Know the Reclining Sofa Is Assembled Correctly?
After the main setup is done, take a few minutes to check that the sofa looks right, feels stable, and reclines smoothly. This final check is important because a reclining sofa can appear fully assembled even when one section is slightly loose or a cable is not positioned correctly.
Start with a simple visual check. The backrests should sit evenly, the armrests should line up well, and the sofa should look balanced from both the front and the side. If one side appears higher, wider, or more forward than the other, a section may not be fully connected. For power models, the cables should be tucked safely away and should not hang near moving parts.
Then test how the sofa feels in normal use. Sit in each seat, shift your weight naturally, and recline each position once or twice. The motion should feel smooth and controlled, without scraping sounds, rocking, or sudden resistance. A properly assembled reclining sofa should feel steady, level, and comfortable from the first use.
Use this quick final check before daily use:
- all sections are fully connected
- backrests feel locked in place
- armrests or side panels sit evenly
- the sofa stands level on the floor
- each seat reclines and returns smoothly
- power functions respond correctly
- no cable is loose, pinched, or trapped under the frame
Once everything works, a simple clean leather recliner sofa routine also helps keep seams cleaner and the seating surface in better shape over time.

Why Isn’t My Reclining Sofa Working, and When Should You Call for Help?
Small setup problems are common, especially with new power or sectional recliners. Most issues come from loose connections, poor alignment, or parts that were not fully locked into place.
Why is the recliner not working properly?
Check the basics first. A backrest may not be fully seated, a section may be slightly misaligned, or a power cable may be loose or pinched. Test the sofa again after rechecking those points.
When should you contact support?
Stop and contact support if you notice:
- bent or broken brackets
- torn wires or damaged plugs
- loud grinding sounds
- missing hardware
- a motor that still does not work after correct setup
These problems usually need replacement parts, not more force.
FAQ
Can a reclining sofa fit through a narrow doorway?
Yes, sometimes, but you need more than the product width. Measure doorway width, hallway turns, and the sofa’s diagonal depth. Many delivery problems happen because buyers measure the wall only and ignore the path the sofa must travel to reach the room.
How much wall clearance does a reclining sofa need?
It depends on the mechanism. A wall-hugger recliner may need only about 3–4 inches from the wall, while some standard recliners need around 10–12 inches. Always confirm the product specs before you finalize the room layout.
Does a high-leg power recliner stay stable when fully reclined?
On a well-built model, yes. Povison states that the legs on this high-leg dual power recliner are structural supports integrated into the main frame rather than decorative attachments, so the sofa is designed to stay steady through transition and full recline.
Can you move a reclining sofa without taking it apart again?
Usually, that is not the safest choice. The Povison manual says to disassemble the sofa before moving it after assembly, because dragging or pulling a connected unit can put too much force on the joined parts and hardware.
How long should a quality reclining sofa last?
A well-made reclining sofa can often last 7–10 years or longer with regular use. Real lifespan depends on frame strength, cushion quality, upholstery durability, and how often the reclining mechanism is used.