
Introduction
Learning how to reupholster a sofa can save a well-built piece from the landfill and give your room a fresh, custom look. It is also one of the most satisfying furniture projects for a hands-on beginner. The key is to work slowly, label everything, and treat the old upholstery like a map. In this guide, you will learn how to reupholster a sofa with clear steps, smarter fabric choices, and a few pro tricks that help your finished piece look polished instead of homemade.
Why Should You Reupholster?
Before you remove a single staple, ask one question: is this sofa worth saving? Reupholstery takes time, fabric, and patience, but a solid frame can easily outlast many cheaper replacements. Before you commit, it also helps to compare your current piece with newer styles, sizes, and materials in today’s sofa collection.
Is Your Sofa Frame Worth the Effort?
Not every sofa is worth saving. A weak frame can waste your money and time, even if the outside looks decent. Before you reupholster furniture, do two simple tests:
- Weight test: Heavy sofas often have solid wood or quality plywood frames.
- Sound test: Tap the frame. A solid, dull sound is better than a hollow one.
- Joint check: Look for glued, screwed, or doweled joints instead of loose staples only.
- Movement check: Push on the arms and back. Too much wobble is a warning sign.
If the sofa feels light, hollow, and shaky, it may not be worth the effort. But if it feels dense and stable, it is often a great candidate to reupholster sofa instead of replacing it.
Customization and Sustainability
Reupholstery is not only about saving money. It also gives you more control over what your home looks and feels like. You can choose textures, colors, and fibers that are hard to find on mass-market furniture.
It also reduces waste. Keeping a solid frame out of the landfill is a smart design choice, especially if you care about long-term value. Many people who think about sustainable furniture eventually realize that restoring what they already own can be more satisfying than buying something disposable.
What Tools and Materials Are Essential for a Pro Finish?
A better result usually starts with better prep. You do not need a full workshop, but you do need the right basics. Good tools make the work cleaner, safer, and much less frustrating.
The Upholstery Toolkit Check-list
Here is a practical beginner toolkit:
- Staple gun – manual or pneumatic
- Staples – the right size for upholstery work
- Staple remover – much faster and safer than prying staples out with a screwdriver
- Needle-nose pliers – useful for stubborn staples and tacks
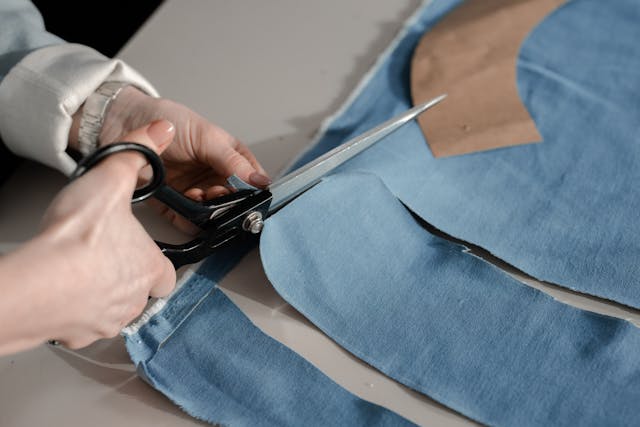
- Fabric scissors – sharp enough for clean cuts
- Measuring tape
- Tailor’s chalk or fabric marker
- Webbing stretcher – essential if you need to replace support webbing
- Rubber mallet or tack hammer
- Dust cover fabric – for the underside
- Zip bags and labels – for screws, legs, and hardware
Two tools matter more than many beginners expect: the staple remover and the webbing stretcher. The first saves your hands during tear-down. The second helps you rebuild seat support properly instead of guessing and hoping it holds.
Choosing Fabric by the Numbers (Martindale Test)
Fabric should be chosen with data, not just color. The Martindale test measures abrasion resistance; for everyday home seating, fabrics around 20,000–30,000 rubs are generally suitable for regular domestic use, while much higher counts are better for rougher wear. For homes with pets or kids, aiming around 50,000+ rubs is a practical durability target. (Xometry)
A quick sofa fabric guide can help you compare weave, stain resistance, softness, and maintenance before buying yardage. If this is your first attempt at how to reupholster a couch, choose a plain, tightly woven fabric with little stretch. Stripes, velvet, and slippery weaves are much less forgiving.
Fabric Quick Comparison
| Fabric Type | Beginner-Friendly? | Best For | Watch Out For |
| Cotton blend | Yes | Light-use sofas, easy handling | Can wrinkle and stain |
| Polyester performance fabric | Yes | Busy homes, pets, kids | Less natural hand feel |
| Linen blend | Moderate | Relaxed, tailored look | Creases easily |
| Velvet | No | Luxe finish | Shows pressure marks and alignment errors |
| Large pattern fabric | No | Statement sofas | Hard to match across cushions |
How to Reupholster a Sofa in 6 Professional Steps
This is the most practical part of learning how to reupholster a sofa. The process is not difficult, but it does require order, patience, and accuracy. Treat the old upholstery as your template, and focus on one section at a time for a cleaner result.
Step 1: Document and Deconstruct
Before removing fabric, photograph the sofa from all angles. Then take close shots of folds, corners, seams, and the underside. These details will guide you later when rebuilding each section.
As you take the sofa apart, keep everything organized:
- label hardware bags
- note fabric order
- save trim and panels intact
This is one of the most overlooked parts of how to reupholster a sofa, but it prevents costly mistakes.
Step 2: Strip and Label Old Fabric
Remove the old upholstery slowly and try not to tear it. Each piece can be reused as a cutting template for the new fabric, which makes the job much easier for beginners.
Mark every panel clearly with notes such as:
- inside arm
- outside arm
- top or bottom
- left or right
When I once helped redo a loveseat, two arm pieces looked nearly identical. The chalk labels on the old fabric were what saved us from cutting the new panel the wrong way.
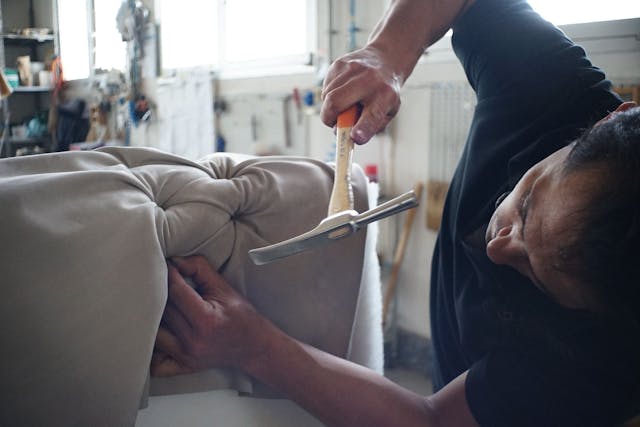
Step 3: Inspect and Repair the Foundation
With the outer fabric removed, inspect the structure underneath. Check the springs, webbing, foam, batting, and frame joints. If the foam is crumbling or the seat support sags, fix it now before applying new fabric.
A sofa may look fine on the outside but still feel uncomfortable if the foundation is worn out. People who successfully reupholster furniture usually spend just as much attention on what is underneath as on the visible finish.
Step 4: Cut and Dry-Fit the New Fabric
Lay the old fabric pieces over the new material and trace them carefully. Add 2 to 3 inches on each side so you have enough fabric to pull and staple securely. If the fabric has a visible pattern or directional weave, keep every panel aligned the same way.
Before stapling, test each piece on the sofa. This dry fit helps you check shape, placement, and coverage before committing. It is especially helpful when you reupholster settee pieces or smaller sofas for the first time.
Step 5: Secure Fabric with Professional Tension
Attach fabric from the center outward instead of stapling from one end to the other. This keeps the tension even and reduces wrinkles, twisting, and puckering.
A simple order works best:
- center front
- center back
- center left
- center right
- fill in between
- finish corners last
This method is especially useful for beginners learning how to reupholster a couch, because it keeps the surface smooth without over-pulling the fabric.
Step 6: Finish with Dust Covers and Legs
Once the main upholstery is complete, turn the sofa over and attach a clean dust cover to the underside. This step hides the webbing, springs, and raw fabric edges, and it instantly makes the piece look more finished. After that, reinstall the legs and check the sofa from every angle for loose threads or uneven corners.
It is often the final details that separate a rushed DIY piece from one that looks polished. A neat underside, smooth edges, and balanced lines can make your finished sofa reupholster project feel far more professional than expected.
A simpler option, of course, is to skip the labor and choose a ready-made design with an updated fabric look. The modern cream sofa is a good example: soft chenille, a clean modern silhouette, and an adjustable backrest that gives you some of that custom comfort without doing a full reupholstery project.

How to Avoid the “DIY Look”: Expert Tips for Success
Good upholstery is not only about attaching fabric. It is about making the sofa look balanced, smooth, and intentional. Small details are often what separate a beginner result from a professional-looking one.
Mastering Pattern Alignment
IIf your fabric has stripes or geometric shapes, start from the centerline. Find the visual center of the sofa back or seat, then match it to the center of the fabric pattern before stapling anything.
Keep these rules in mind:
- Start from the middle
- Check alignment before every pull
- Step back often and look at the whole sofa
- Allow extra fabric for pattern matching
Even a small drift can make the finished sofa look crooked.
Managing Corners and Folds
For outside corners, use an envelope fold instead of cramming excess fabric under one staple line. Fold one side flat, bring the second side over it cleanly, and keep the fold pointed toward the least visible angle. This creates a sharper, tailored edge.
If you also want long-term upkeep to stay easy after the project, knowing how to clean a fabric sofa helps preserve the crisp look of your newly upholstered piece. Gentle maintenance matters almost as much as clean stapling.
When Should You Call a Professional Instead?
Not every project is beginner-friendly. Some sofas are simple enough to handle at home. Others involve repairs that can quickly become expensive or frustrating.
Call a professional when you notice:
- 8-way hand-tied springs
- Deep tufting
- Major frame damage
- Loose carved wood details
- Complex sectionals
- Severe sagging in multiple areas
You should also pause and do the math. The cost for reupholstering couch frames with premium fabric, foam, and tools can add up fast. If the sofa has major structural issues or the project is taking too much time for the value you will get back, hiring a pro may be the smarter choice.
Conclusion
Once you break it into stages, how to reupholster a sofa feels much less intimidating. The project rewards patience more than raw skill, and every careful step improves the final look. If your frame is solid, your fabric is durable, and your labeling is clear, even a first project can turn out beautifully. Start with a simple shape, work section by section, and treat the old upholstery like a blueprint. That is the simplest way to turn a worn couch into something custom, useful, and worth keeping.
Q&A: Common Reupholstery Hurdles
How much fabric do I actually need?
Most standard sofas need roughly 12 to 18 yards, but the real number depends on sofa size, cushion count, and pattern repeat. Always measure each panel and add extra for mistakes, matching, and corner wraps.
Can I reupholster over the old fabric?
Sometimes, but it is rarely the best choice. Leaving the old layer in place can trap dust, hide damage, and create bulky corners. For a cleaner shape and longer-lasting result, remove the original upholstery first.
What is the easiest fabric for a first-timer?
A medium-weight, tightly woven plain fabric is usually easiest. It cuts cleanly, pulls evenly, and hides minor mistakes better than velvet, leather, or bold patterns. Performance fabrics are especially beginner-friendly for family use. Avoid velvet, leather, and large patterns for your first re cover a sofa project.